- Hardware Manuals
- Commissioning and Tuning Guide
- Software Reference
- Resources
The servo drive is connected to power supply, motor, position sensor and to a computer.
OBLAC Drives is installed, running and established a connection to the servo drive.
The latest firmware is installed on the drive.
All basic configuration parameters of the motor and sensor are copied from their datasheets to the drive configuration.
The position sensor provides plausible data, the commutation offset was found.
Ideally, the Autotuning was performed successfully.
If all the prerequisites ar met, the motor can be tested.
Go to OBLAC Drives.
Switch to the Playground section from the top menu.
Select “TORQUE CONTROL”.
Use the slider or the buttons to enter a reference torque.
Important
Applying a constant torque means that the motor shaft will start moving and not stop before you manually set it back to a lower value. If anything is attached to your motor shaft (e.g. robotic manipulator), make sure there are no mechanical limits to be exceeded or anything might be hit.
Torque is given in the unit per thousands of rated torque. So, if the motor’s datasheet specifies T_rated = 0.5 Nm and you entered the corresponding 500 mNm into your configuration, setting the torque setpoint to 100 will lead to:
100 * 1/1000 * 0.5 Nm = 0.05 Nm
Usually, a value between 50 and 300 should be sufficient to make any motor start rotating - regardless of its absolute size and rated torque
The motor should start rotating now and you should be able to observe the motion in OBLAC Drives.

One of the next steps can be testing the velocity control mode. The Playground allows to set and alternate the velocity setpoint. Before, the Velocity controller has to be tuned. Select the velocity increment size, enable the velocity controller and try out different velocity setpoints. Position, torque and other signals can be observed if needed.
You may also configure additional features such as:
Common tasks in robotics involve moving a manipulator, vehicle or gripper to a predefined position. In order to do so, your SOMANET servo drive comes with an internal position controller that can be configured and adapted to your surrounding mechanical system automatically.
Enter a target position in the units of encoder increments (‘ticks’) and see how the motor moves there. Depending on your encoder resolution, quite large numbers are necessary to create visible motions. For example, with a 16-bit encoder 65,536 ticks represent one motor shaft revolution. If you even have a reducer (gearbox) attached to your motor shaft, you may have to change the position setpoint by several 100,000 ticks to create visible motion. However, we recommend to start with small steps and then slowly increase them.
Finally, you can check the performance of your position control loop by using one of the position setpoint test functions available in OBLAC Drives. Depending on what suits your application best, you can choose from:
step
sinusoidal
trapezoidal
position reference signals.
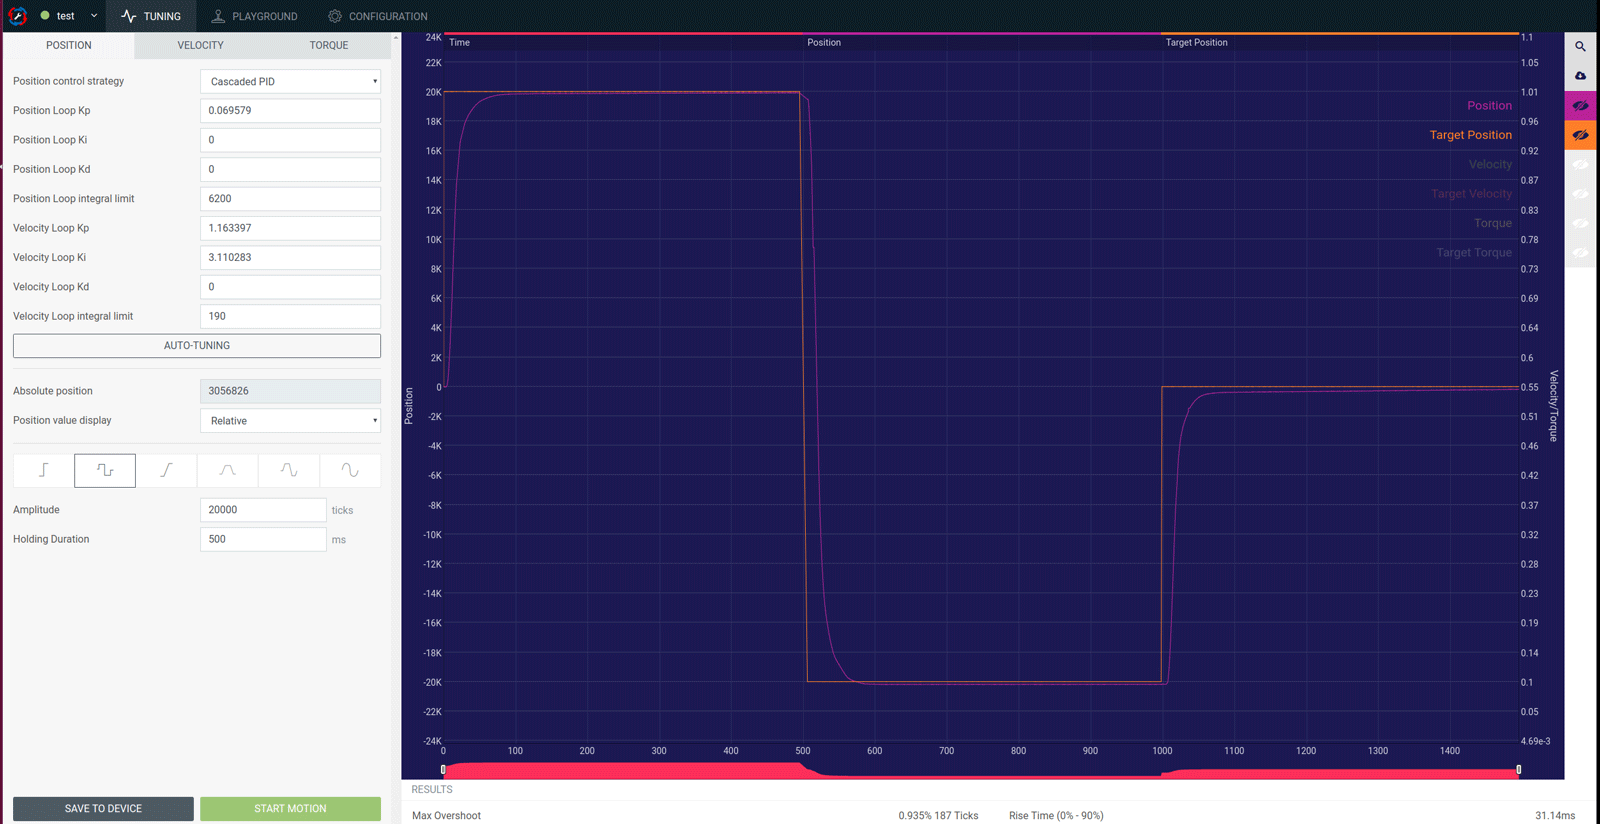
Use the buttons on the right hand side of the window to see detailed plots of the tracking behavior (position setpoint and actual position) and other values like the torque. You can use the figures to check if the overshoot, response times or bandwidth of your entire control loop suit your application.
If you encounter any problems, make sure they are sorted out before you continue. Reviewing the above-mentioned list of prerequisites should be your first step. You can also have a look at our troubleshooting site.
